

How to CAPTURE Image and Deploy Image using WDS
How to Capture Image and Deploy Image using WDS Server 2012 R2
Windows Deployment Services (WDS) is used to capture image and deploy operating system(OS) images also know as WDS images remotely to other computers over a network. In earlier post we have learned the steps to install WDS Server 2012 and install OS using WDS Server 2012 R2. In this post we’ll capture image of OS by using Windows Deployment services image Capture wizard and then we would deploy it to other computers and servers in the environment.
Capture Image is required for an environment where you have to deploy similar Operating System and some common applications on multiple computers. It save lots of administrative efforts required for large deployment.
Before we start with the steps of capture image, install an OS on the Server and then install all the applications that are common for your environment also know as base applications for the Production environment.
In addition to that, ensure that DHCP Server is working in your environment. Change the booting sequence to “Boot from Network” and then follow the steps given below.
Steps to Capture Image using WDS (WDS Images)
1. Open Windows Deployment Services (WDS) console, expand Server name and select “Boot Images”. Right click on the boot image, select Create Capture Image to create the capture image. This capture image will help to boot the computer to capture computer’s OS for further deployment of Operating System to other computers either client or server.

2. On “Create Capture Image Wizard“, enter the name and description of the image. Click on browse to specify the location where this would can be saved. Click on Next, this will create the capture image and saves it to the location that we have specified.

3. On “Create Capture Image Wizard”, when the image is successfully created check on the “Add image to the Windows Deployment Server now” to add this captured boot image to the WDS server now, you can also add this image later from the WDS console. Click on finish to upload the OS file and close the console.

4. We can verify if Capture image is uploaded to WDS Server or not by selecting “Boot Images”.

5. Before we start with the steps of capture image using Windows Deployment Services, make some changes on the server. In this practical, we have created some folders in the C: drive and installed the role of Remote Desktop Services. In addition to that, you can install few additional software or make any other changes as per your organization’s requirement.
How to install Domain Controller

6. Open Run, type sysprep and click on OK. It is a system preparation tool and its default path is “C:\Windows\System32\sysprep”. It is used to define new computer name and unique SID to the newly build computer.

7. Double click on Sysprep. Sysprep will prepare our computer for the capturing.
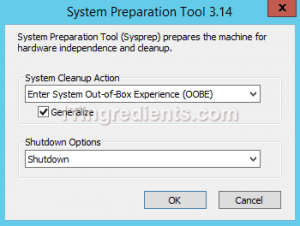
8. On System Preparation Tool console, we can see the importance of sysprep. It will prepare the machine for hardware independence and cleanup. Check on Generalize and select “Shutdown” from the drop down menu of Shutdown Options. Click on OK. Sysprep will start working and then shutdown the computer.
9. Change the boot sequence to “Boot from Network” before powering on the Server. Power on your computer and press F12 to make your computer boot from network.

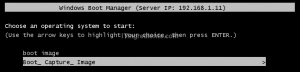
10. On “Windows Boot Manager” select the capture image and hit enter.
11. On “Windows Deployment Services Image Capture Wizard“, details about WDS and all the pre-requisites are mentioned. Click on Next to continue.

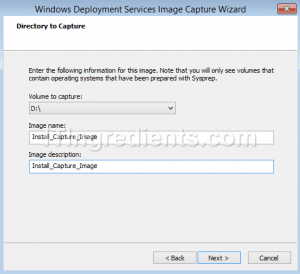
12. On the “Windows Deployment Services Image Capture Wizard” console, select the directory or volume to capture. Don’t get confused if you don’t see C:\ here and only see D:\ as C:\ would be used for booting and D:\ is the original drive that has all the information. Here, we have selected D: drive to capture an OS. Enter name and description and then click on Next to continue.
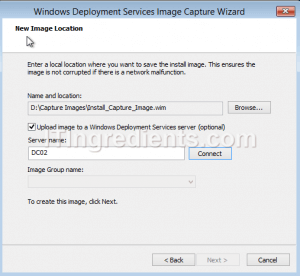
13. On the location console, click on browse to enter the location where this file would be saved locally. Check on “Upload image to a Windows Deployment Services Server” to directly upload this file to the WDS server. Enter the name of WDS server in Server Name field and click on connect.
How to promote Additional Domain Controller
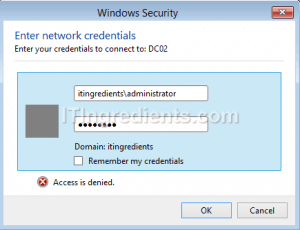
14. A “Windows Security” console would ask for domain administrator credentials. Enter credentials and click on OK.
15. Select the group menu from drop down menu and click on Next to start capturing. 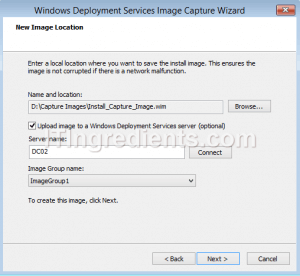
16. After the completion of capturing install image click on Finish to close the wizard.

17. On WDS Server, expand server name (how to rename Windows Server), expand Install option, expand group and verify if the captured Operating System is uploaded to the WDS console or not.

How to Deploy Captured Image using WDS
Before we start with the steps of deploying captured image, ensure that DHCP server is working in your environment and client is enable for boot from network.
18. On the client computer, press F2 and go to the BIOS option and change the boot option to “Network”.
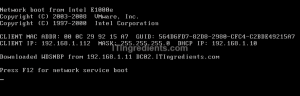
19. When the client received IP address from DHCP (configure DHCP Server) it will be ready to boot from network. In this example client received an IP address that is 192.168.1.112. Press F12 for network boot.
20. Select the boot image and not the Capture Image to boot the computer from network. Client machine loads the boot.wim file from the WDS server.
21. It starts booting the client from the boot file on WDS server. The IP address of WDS server is 192.168.1.11 and path of boot image on WDS server is “\Boot\x64\Images\boot.wim”.

22. On Windows Setup console select location and keyboard or input setting and click on Next.
23. Enter the domain credentials to make this client install OS through WDS (Winodws Deployment Services).
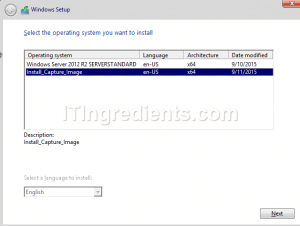
24. On Select Operating System console, list of all the Operating Systems are listed which were added in the WDS server. Select “Install_Capture_Image” to install the captured Operating System on the client computer. Click on next to continue.
25. After the completion of Operating System installation, verify that the folders that we created and the roles that we installed exist on the client computer. It confirm that the OS that we captured is successfully installed on the client computer.
26. Similarly you can deploy the captured Operating System on all the client machines. It can be used for deploying Windows 7 image over network along with other WDS images e.g. Server 2012, Windows Server 2008, Windows 7, Windows 10, etc. Windows Deployment services for Windows 10 is a great tool used by System and IT Administrators to capture and to deploy OS images in most of the Organizations.
Can we also use WDS to capture Windows 10 OS image?
Yes you can use WDS (Windows Deployment Services) to capture Windows 10 Image. Process would remain the same.
I found this video, it explains the steps to install and configure WDS on Windows Server 2008 R2.
https://www.youtube.com/watch?v=lxHZVfV699c
I’ve multiple offices in US can I use the same technique to deploy Windows image over the network or any changes is required?
I believe in the 80/20 rule. you know, where 80 of all reward comes from 20 of the effort? Well, I believe your blog is that 20. I’ve added you to the list of sites that I frequent. Thank you for the in depth and detailed blog posts. Not many people are willing to do that anymore.
I must say you have very interesting posts here.
Is there any difference in Capturing and Deploying Windows 10 and Windows 7 image deployment?
Nice explanation to setup Windows Deploy Services. It helped me in automating all my Server provisioning.