

How to Publish Content in Citrix XenApp 6.5
How to Publish Content in Citrix XenApp 6.5
In this post, we will learn the steps to publish content in Citrix XenApp 6.5. Through the content publishing in the XenApp 6.5, we can make important documents, media files, and any other type of files available to the users. These files can be make available from any network location. Users can access the content as easily as they access published applications and desktops. In the previous posts, we have already learned the steps to install Citrix XenApp, Configure Citrix XenApp, publish an application, publish a desktop in Citrix XenApp 6.5.
Steps to publish content in Citrix XenApp 6.5
1. To publish content in Citrix XenApp 6.5, open Citrix AppCenter. Right click on Applications and then click on “Publish Application“. Through this console, we can manage all the administrative tasks in Citrix XenApp.

2. On the Welcome console, click on Next to continue.

3. On Name console, enter the name of the content which our users can see. For this practical, we have enter “Content” as the display name, you can define the content as per your requirement. Click on Next to continue. We can also add a description for the application to be published.

4. On Type console, select the option of “Content” as the type of application to publish. Click on Next to continue.

5. On Location console, enter the UNC address of the content to be published. Create a Share folder and copy the content in that folder. Users must have the access rights for the resources we are specifying. In this practical, the UNC path of the content we are publishing is “\\ctx01\Content\Doc 1.txt“. Click on Next to continue.

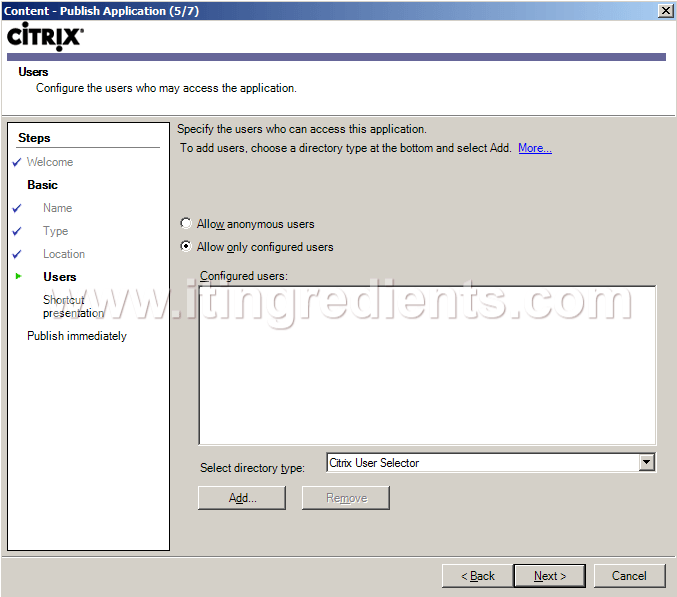
6. On Users console, configure the users who can access this content. Select the option of “Allow only configured users“. Click on “Add” to add the users for accessing this content.
7. On Select Users or Groups console, double click on your domain to add domain users. In this practical, our domain is “Itingredients.local“. On Connect to Itingredients.local console, enter the credentials of domain administrator and click on Ok.

8. Again on Select Users or Groups console, select the domain users or groups who can access the published content. For this practical, we have added three users of our domain. Click on Ok.

9. Again on Users console, we can verify the users to whom we want to give access rights for the published content. I’d recommend to give access to Groups instead of giving to individual Users. Click on Next to proceed further.

10. To publish content in Citrix XenApp 6.5, on Shortcut presentation console, we can change the icon of the content by clicking on the “Change icon” button. From this console, we can also add the shortcut of this content to the client’s start menu and desktop. Click on Next to continue.

11. On Publish Immediately console, we can disable the application initially by selecting the option of “Disable application initially”. After selecting this option, the application will be disabled for the users. We can enable it later. We can also configure the advanced application settings by selecting its option. We have not selected any option on this console for this practical. Click on Finish to publish the content.

12. Now on any client computer, open Internet Explorer and type the address of your web interface in the address bar. For this practical, the address of our web interface is”ctx02.itingredients.local“. Login on the Citrix console using the credentials of any user who has rights to access the content. Also ensure that the Citrix Reciever is installed on the client computer before accessing the content.
13. We can see the published content under the Content menu. Click on the content to access it.

Hope you understood the steps to publish content in Citrix XenApp 6.5. Please feel free to leave your comments and suggestions in the comments section.