

How to Publish Application in XenApp 6.5
How to Publish Application in XenApp 6.5
In this article, we’ll learn the steps to publish application in XenApp 6.5. We already learned the steps to install xenapp 6.5, steps to configure xenapp 6.5 and steps to install and configure Citrix Web Interface. In this article, we’ll learn to publish pre-installed application.
In future articles, we’ll learn the steps to install custom applications and steps to publish those applications.
1. Citrix AppCenter is the console to manage Citrix XenApp. This single console can be used to perform all the administrative tasks. Open Citrix AppCenter and select Applications. It would show all the published applications.

2. To publish application, right click on “Applications” and select “Publish application” or on the right hand side click “Publish application” under actions.

3. A wizard will be started. Click on Next to continue.
4. Under “Display Name”, type the name that you want to display to users. You can even give application description, it would be good to mention some detailed description.

5. Choose the type of application you want to publish. In this practical, we’ll publish an application on Citrix Xenapp server and users would access applications from server. We’ll talk about other options i.e. publishing content, publishing server desktop and stream to client in future articles.

6. In command line select browse to browse the path of application that you want to publish. In this practical, we’ll publish notepad therefore we need to browse to c:\windows\system32\notepad.exe. Please ensure you remember the path of application that you custom installed. In working directory define the same.

7. Add the servers that host above mentioned application. Installing application on multiple servers will provide load balance and high availability. Select add to add the list of servers.

8. Select the list of servers from the Citrix Farm. You can also create a “Worker Group”, we’ll talk about worker group in future articles. Double click on the servers.

9. List of all the Citrix XenApp servers in the farm will be displayed here. Select the servers that host the application and click “Add”. Click OK. Please don’t add the server that doesn’t host the application as it would not load balance Citrix environment.

10. Click next to continue.

11. We need to define the list of users who can access the published applications. Click Add.

12. Select the domain name as we are giving access to domain users. It would show all the containers and organizations unit. We have two users created in users containers. It is recommended to create a group and add users in the group and give access to the group. We don’t have any group therefore we’ll give access to the TU1 and TU2 user. Select the users and click on Ok.

13. Click on next to continue.

14. Application icon can be changed by clicking on “Change icon”. Moreoever shortcut can be created either to the client’s start menu or on client’s desktop.

15. If you don’t want to disable the application initially then select the option. You can also configure advanced settings. We’ll talk about advanced application settings in future articles. Click on finish to close the wizard.

16. In Citrix AppCenter, under applications we can see Notepad is published.

Access published application on client machine.
1. Citrix receiver is required to access the application. Please ensure that Citrix receiver is installed on all the client devices on which we are planning to access virtual applications.
2. Insert DVD of Citrix XenApp and browse it.

3. Open “Citrix Receiver and Plug-ins”.

4. Open windows folder.

5. Open receiver folder.

6. Install “CitrixReceiver Enterprise”.

7. Please ensure that installation is completed successfully.

8. Open browser and right click on top bar and select “Run Add-on”.

9. ActiveX component will ask the confirmation to run the add-on. Select run.

10. Allow the web contents to run on computer.

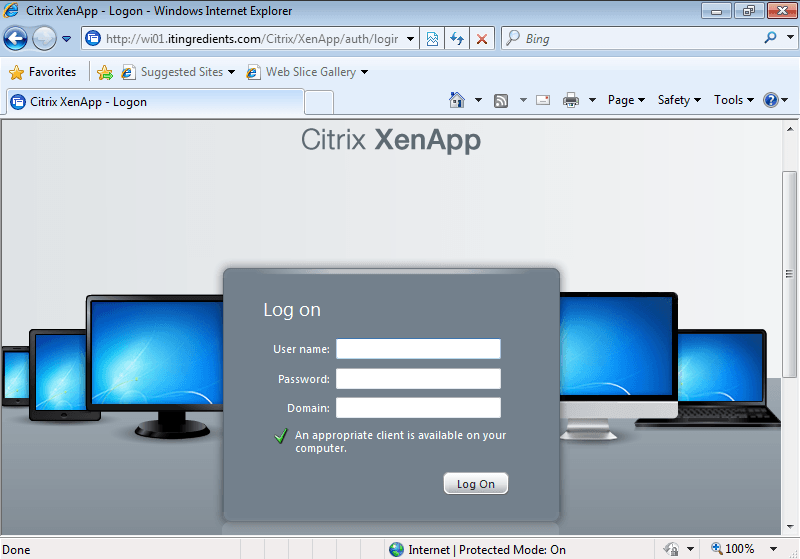
11. Green check confirms that add-ons are installed successfully on the client machine. Type the user credentials to access the published applications. We’ll type credentials of TU2 user.
12. We only have Notepad published on the Citrix XenApp server. We can see that Logged on user is TU2 and user has access to the application.

13. Click on the notepad icon and this would open Notepad for you.

Similarly you can publish other applications and access them from client devices. Citrix claims that application virtualization it supported on almost all the devices i.e. Desktops, Laptops, Mobiles, Tablets, etc.