

How to Install Citrix VDA (Virtual Delivery Agent)
How to install Citrix VDA (Virtual Delivery Agent) for XenDesktop 7.8
In this post, we’ll learn the steps to install Citrix VDA (Virtual Delivery Agent) for Citrix XenDesktop 7.8. Citrix VDA is used to deliver applications and desktops from Windows desktop OS or Server OS -based machines. VDA is required to be installed on all the Virtual Desktops that you want to assign to end users. It manages the connection between the virtual machines and DDC (Desktop Delivery Controller). VDA is a pre-requisite before you start creating any Virtual Machines.
For this practical, we’ll install Citrix VDA on Windows Desktop OS. We have already installed Citrix XenDesktop 7.8 and configured Sites in XenDesktop 7.8.
Steps to Install and Configure Citrix VDA for XenDesktop 7.8
1. Either you can download the setup of VDA Workstation 7.8 from Citrix Website or map the DVD of XenDesktop 7.8 and click on “Virtual Delivery Agent for Windows Desktop OS” for Desktop OS or click on “Virtual Delivery Agent for Windows Server OS” for Server OS.
2. On the Environment console, select the Configuration type. Select “Create a Master Image” if we are using the Machine Creation Services or Provisioning Services to create virtual desktops from this master image. Either you can select an option “Enable Remote PC Access” to install the Virtual Delivery Agent on a physical machine or a virtual machine that has been provisioned without the VDA. Click on Next to continue.

3. To install Citrix VDA, on HDX 3D Pro console, select “No, install the standard VDA“. If we select the “Yes, install the VDA for HDX 3D Pro” then the HDX 3D pro will be installed. It will enhance the performance of programs and applications having comprehensive graphics. Click on Next to continue.

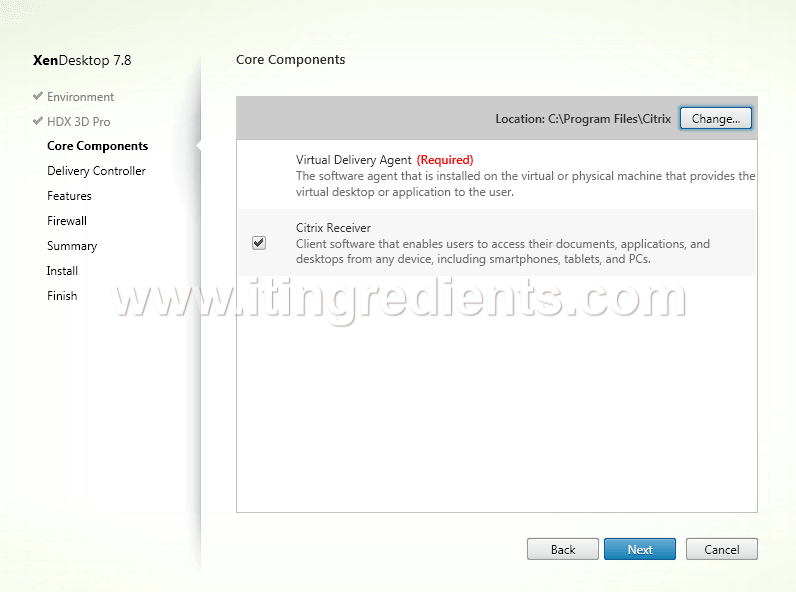
4. To install Citrix VDA, on Core Components console, we can see that the Virtual Delivery Agent is required in the installation process. We have also selected the Citrix Reciever to be installed. It enables the users to access their applications, desktops and documents from any device. The default location of these installations is “C:\Program Files\Citrix“. We can change this path by clicking on the button of Change. Click on Next to continue.
5. On Delivery Controller console, under “How do you want to enter the locations of your Delivery Controllers?” select “Do it manually“. Enter the Controller address, click on test connection to check the connectivity with the Delivery Controller and then click on Add. Click on Next to continue. The address of our delivery controller is “xd01.itingredients.com“.

6. On Features console, all the features are selected except “Personal vDisk” because we are not going to use Personal vDisk, we’ll discuss the same in future articles. Click on Next to proceed.

7. On Firewall console, all the default ports are listed. Under Configure firewall rules ensure that the option of Automatically is selected. Click on Next to continue.

8. On Summary console, review all the components that are selected on previous consoles. Click on Install to proceed with the installation process.

9. During the installation process, a dialog box appears regarding the restart of the computer. After the installation of some components, the computer needs to be restarted before continuing the installation. Click on Restart Now to restart the computer.
10. After restarting the computer. Installation would resume automatically, however if it doesn’t resume automatically then click on Add, Remove or Reconfigure Components console, click on the option of “Add components and prerequisites“. It will continue the installation process.

11. On Finish console, we can see that all the prerequisites, core components are installed successfully. Click on Finish to close the console.
Hope you understood the the steps to install Citrix VDA (Virtual Delivery Agent) for Citrix XenDesktop 7.8. Please feel free to leave your comments and queries in the comment section given below.
Great job and i have few recomendations can you please help me
How can we help you ?