
How to run Hyper-V nested in VMware Workstation
How to enable Hyper-V nested in VMWare Workstation
In this article we’ll learn the steps to configure Hyper-V nested in VMWare Workstation. Nested Virtualization is the ability to run virtualization within virtualization i.e. on Virtual machines. In other words, we can say the process of creating virtual machines on a virtual machine. In this practical, we have created a virtual machine naming HV01 on VMware Workstation and then try to install the role of Hyper-V on HV01. But by default nested virtualization is not supported. To enable the nested virtualization in VMware Workstation, we have to modify some virtual machine settings.
Steps to enable Hyper-V nested in VMWare Workstation
1. Open Server Manager and click on “Add roles and Features” to install the role of Hyper-V.

2. On ‘Add roles and feature Wizard’ we will verify all the prerequisites like administrator account has a password, the valid static IP address is configured on the box, etc. These pre-requisites are to completed, before proceeding further. Click on Next to continue.

3. On “Select Installation Type” console select Role-based or feature-based installation and click on Next to continue.

4. On “Select destination server” wizard, in server pool all remotely manageable servers are listed, select the computer on which you want to install the role and click on Next to continue the installation process.

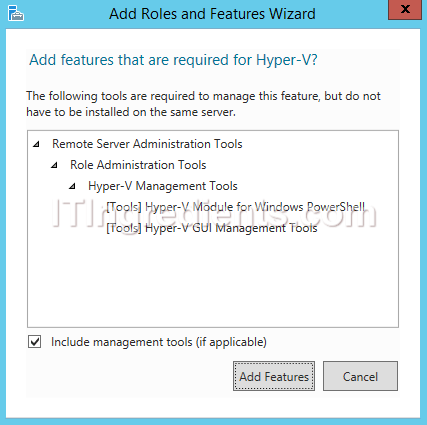
5. On Select Server roles console, Select Hyper-V then a box appears regarding the installation of required features for Hyper-V. Click on Add Features to continue this installation process.
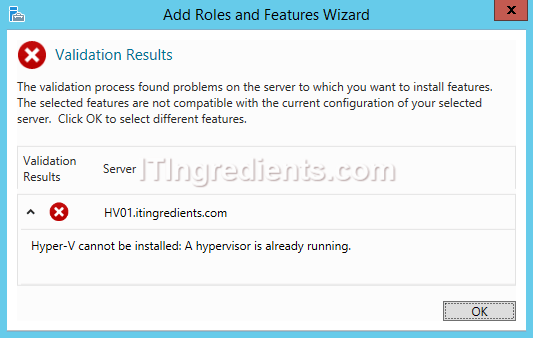
6. An error box appears regarding the error “Hyper-V cannot be installed: A hypervisor is already running“. This error emerges, because we are trying to install Hyper-V on a virtual machine running on VMware Workstation. By default nested Virtualization is not supported on VMware workstation. Click on ok to close this console.
Steps to enable Nested Virtualization
7. To enable Nested Virtualization on the virtual machine running on VMware Workstation, we have to modify the .vmx file of that particular machine. Virtual Machine Configuration (.vmx) is the initial configuration file, which stores all the selected settings from the New Virtual Machine Wizard.
8. Shutdown the machine (HV01) and click on the “Edit virtual machine settings”.

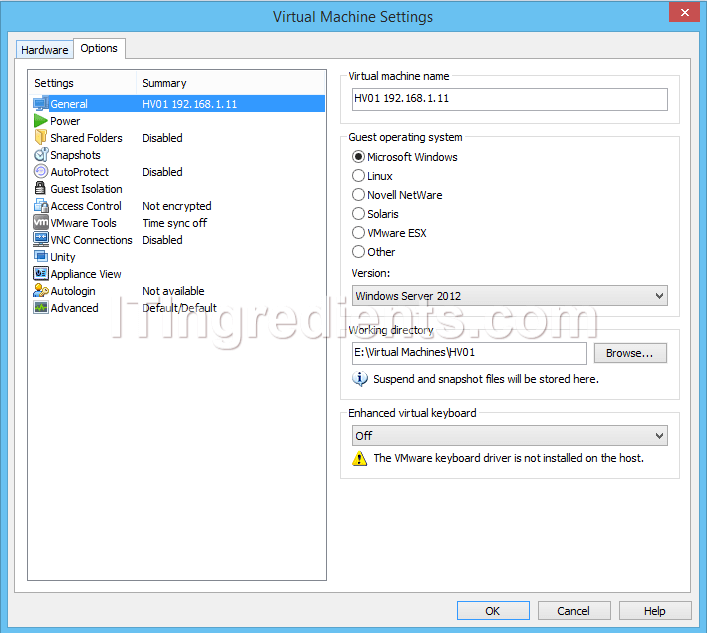
9. On “Virtual Machine Settings” console, click on Options and then click on General, to verify the working directory (E:\Virtual Machines\HV01) of the virtual machine.
10. Now open the path (E:\Virtual Machines\HV01) and search for .vmx file of this virtual machine. In this scenario, HV01 is the name of the .vmx file.

11. Open the .vmx file (HV01) in notepad and add hypervisor.cpuid.v0 = “FALSE” and save this file with the modification. This line will modify the settings and enable the hypervisor for this virtual machine.

12. Now restart the virtual machine (HV01) then try to install the role of Hyper-V. Again we get an error that “Hyper-V cannot be installed: The processor does not have required virtualization capabilities“. This error appears because virtualization in not enabled in the processor settings.

13. Again shutdown the machine (HV01) and click on “Edit virtual machine settings” to enable the virtualization in the processor settings of this virtual machine.

14. On “Virtual Machine Settings” console, click on processors then, check the option “Virtualize Intel VT-x/EPT or AMD-V/RVI” to enable the virtualization. Click on OK to save these settings.

Now, Again restart the machine and try to install the role of Hyper-V, it would be installed without any issue. However you can check the steps to install Hyper-V on Windows Server 2012 R2.
Very useful article.. It resolved my issue and now able to make my VM as hyper V server.
Thanks and appreciate..
Thank you, I’ve just been looking for information about this subject for a long time and yours is
the greatest. I was facing an issue while running Hyper-V nested in VMWare Workstation in my home lab but your article made it really simple for me. Thanks again