
How to Change IP Address in Windows Server 2012 R2 (GUI)
How to Change IP Address in Windows Server 2012 R2 (GUI)
In this post, we’ll discuss the steps to assign/ configure / change IP address from GUI. Internet Protocol (IP) a unique address which is used by computers to communicate with each other in a network. IP Address is required for all the devices connected to a network. It would be hard to communicate the devices without Internet Protocol. We can use multiple ways to change IP address in Windows Server 2012, Windows Server 2008, etc.
Steps to Change IP Address in 2012 R2 from GUI
1. To change IP Address, right-click on Start button and click on RUN or press Windows Key + r from the keyword to open run.
2. In the run type “ncpa.cpl”. It will open the Network Connections window.

3. In network connections window, we can see all the available networks. Here, the network name is ETHERNET0. Now double click on network’s icon for which you want an IP to be changed, it would open properties console of Network Adapter or right click on Network adapter and click on properties.

4. Click on properties option in Ethernet0 status.

5. In this example, we are assigning IPv4 therefore un-check the check box of IPv6. IPv4 is 32 bit and IPv6 is 64 bit. IPv6 can be used to define IP to almost all the devices under the sun. We’ll talk IPv6 in detail in the future article.
6. Select “Internet Protocol Version 4 (TCP/IPv4)” and click on properties or double click on “Internet Protocol Version 4 (TCP/IPv4)” to open its properties.

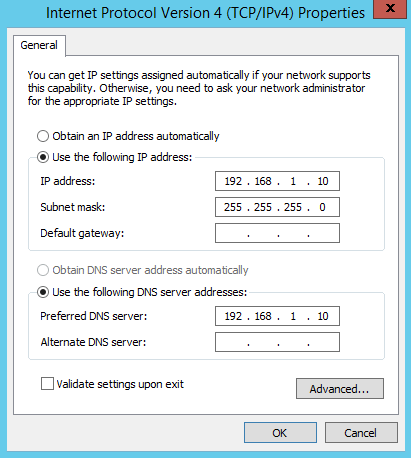
7. By default “Obtain an IP address automatically” is selected. This option is required to assign a dynamic IP address i.e. from DHCP (Dynamic Host Configuration Protocol). But we don’t assign dynamic IP address to Servers, therefore we’ll assign static IP address to this machine. Select “Use the following IP address” to change IP address.

8. To change IP address, type IP for example 192.168.1.10 and click in subnet mask column, it will automatically take subnet IP i.e. 255.255.255.0. Subnet mask is different for different types of IP classes. For Class A default subnet mask is 255.0.0.0, for Class B default subnet mask is 255.255.0.0, for class C default subnet mask is 255.255.255.0. In Preferred DNS type an IP address of your DNS. In this practical we are going to promote this machine as Domain Controller therefore we’ll use this machine’s IP.
9. To verify IP is assigned, click details on Network Connection Details window. Click on close to close the Network Connection details.

Hope all the steps are clear. If you are addicted to command then use the command “NETSH” to change IP Address. To now more about changing IP address from command visit the link below to know the steps of “How to change IP Address from command prompt“.