How to deploy OS using WDS in Windows Server 2012 R2
What is WDS Server 2012 ?
WDS i.e. Windows Deployment Services 2012 is a tool used to deploy OS remotely. It boots the client machine via network and start deploying OS remotely. In this post we’ll discuss about the deploy OS using WDS Server 2012 via boot image and install image through WDS Server 2012. After you install WDS, please ensure that your DHCP services are working and have enough IPs available for client machine.
Insert bootable DVD of 2012 Operating System, it is required to copy boot image and install image. Boot image will be used to boot the client machine and install image would deploy the Operating System on the client machine.
How to Install WDS Server 2012 R2 Step by Step Guide
1. Open the console of Windows Deployment Service 2012. Right click on “Boot Image” and click “Add Boot Image“. Please ensure that OS bootable DVD is inserted in DVD drive.
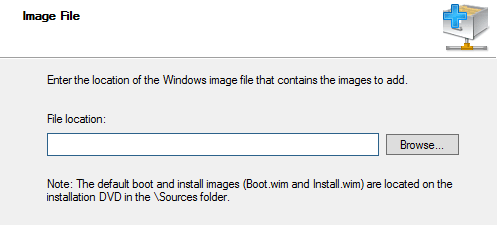
2. A wizard to add boot image would be started, click on “Browse” and select the DVD drive.
3. Browse to DVD and then source folder and select “Boot.wim” file. It contains bootable files required by client machine to boot the computer. Click on Open to add the file.
4. Please ensure that the path of “Boot.wim” file is correct. It is used to boot the client computer while deploying OS using WDS 2012. Click on next to continue.
5. Type the name of image and add the description of image. Click on next to continue.
6. Review the information and if you are good with that, click on next.
7. It would start uploading the image to the WDS server 2012 under boot image folder.
8. Once the boot image is uploaded successfully, click on finish to close the wizard.
9. In “Windows Deployment Services 2012” console, under “Boot Images” we can see boot file.
10. Next step is to add the install image from the DVD. Click on “Add Install Image“.
11. Create a group for install images. It can be used to classify different types of Operating systems. Click on next to continue.
12. Browse to the DVD, open source folder and select Install.wim file.
13. Exact path of “install.wim” file is D:\sources\install.wim, where D: is the DVD drive.
14. Install.wim file contains information of all the versions of Operating systems that we have in the DVD. Select all the versions that you want to add. For this practical we’ll add Standard edition of OS to WDS Server 2012. However you can add all of them if required. Click on next.
15. In summary window, review all the options that you have selected. In case of any changes, click on back to make the changes.
16. OS Image will start uploading to WDS Server 2012.
17. Click on finish, once the file is uploaded successfully.
18. In the “Windows Deployment Services” console, under install images, we can see the uploaded image.
19. Our WDS 2012 R2 Server is ready to deploy OS remotely. At the client side, go to the BIOS setup option. Change the boot option to “Network“. Press F10 to save and exit.
20. Once the client would boot from network. It would pick IP address from DHCP. In this example, we can see that IP address 192.168.1.81 is assigned to client machine. Press F12 from keyboard for network boot.
21. Client machine would load the “Boot.wim” file from the WDS Server 2012 and start booting the client machine. Successful booting confirm the first phase of deploy OS using WDS Server 2012 is completed.
22. Select the location and Keyboard settings and click on next.
23. Type credential of user, who have access to add the computers in domain.
24. Second phase to deploy OS using WDS Server 2012 is to select and install OS. Select “Operating System” console would list all the Operating systems that we added in the WDS Server 2012.
25. To create partitions click on “Drive options”, else click on next to continue.
26. Once the installation is completed, computer would restart automatically.
27. Select the country, language and keyboard settings and click on next to continue.
28. Type Administrator password and then reenter password and click on finish.
29. After settings are finalized, installation of Operation system would be completed.
Conclusion:
Hope you understood all the steps that we have listed to deploy OS using Windows Deployment Service 2012 R2 step by step. WDS 2012 R2 is the best tool used to Capture WDS image and for OS Image deployment.


