
How to Create Virtual Machine in Hyper-V Server 2012 R2
How to create Virtual Machine in Hyper-V Server 2012 R2
In this post we’ll learn the steps to create Virtual machine in Windows Server 2012 R2. Hyper-V is a role in the server edition of Microsoft Windows. Hyer-V provides us the ability to create virtual machines on a physical server. If you are planning to install Hyper-V for your lab purpose on VMware Workstation i.e., nested virtualization then you can use “How to enable Nested Hyper-V on VMWare Workstation“. And for any issues in installing Hyper-V on your machine of Windows Server 2012 R2 use “How to install Hyper-V in Windows Server 2012 R2“. After installing the role of Hyper-V on your machine, we can start with the steps of creating virtual machine.
Steps to create Virtual machine in Hyper-V Server 2012 R2
1. To create Virtual machine, open Hyper-V Manager from Administrative Tools in the Start menu.

2. On Hyper-V Manager console, click on “Virtual Switch Manager..” to create a new virtual switch. A Virtual switch is required for virtual machines to communicate with the physical network and other virtual machines. We have to create a virtual switch before creating a virtual machine because currently there is no virtual switch which will be used. If we have created a virtual switch while, installing the role of Hyper-V then we don’t need to do this now.

3. On “Virtual Switch Manager for HV01” console, choose from the three given type of virtual switches and then click on Create Virtual Switch. In this scenario, we have selected the External.

4. On “Virtual Switch Properties” console, enter the name of the virtual switch. Here, we have given “Vswitch” as the name of the virtual switch. In connection type, External network is selected and from the drop-down menu select the physical network adapter that will be bind to this virtual switch. Click on OK.

5. To create Virtual machine on Hyper-V Manager console, right click on HV01 and then click on New. Click on Virtual Machine to create a new virtual machine.

6. On “New Virtual Machine Wizard” console, all the features of virtual machines and Hyper-V Manager are explained. To create a virtual machine with the default configuration, click on the finish or click on next for customizing the configuration of a virtual machine.
7. To create Virtual machine in Hyper-V server 2012 R2, on “Specify Name and Location” give the name of the virtual machine. Node01 will be the name of this virtual machine. Check “store the virtual machine in a different location” for saving the machine in a different location other than the default location. In this practical, we have changed the machine location to “C:\Virtual Machines\Node01“.

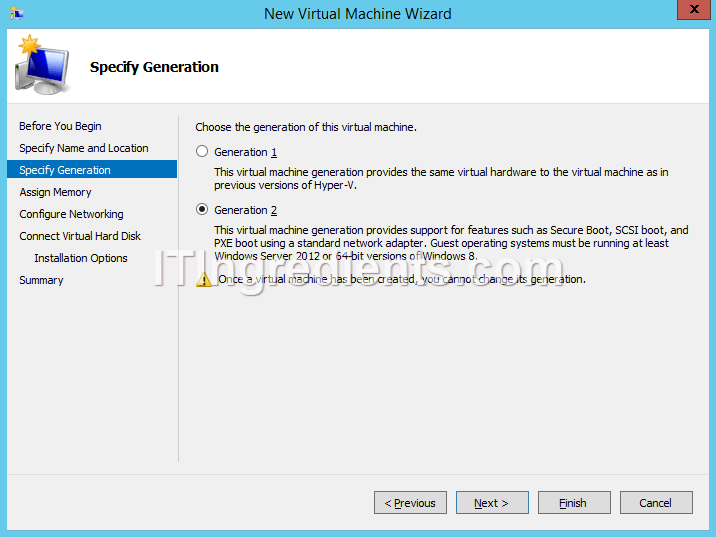
8. To create Virtual machine in Hyper-V server 2012 R2, on “Specify Generation” console, we have selected the Generation 2. This generation provides the support for features such as SCSI boot and PXE boot using a standard network adapter. The basic required operating system for this generation must be Windows server 2012 and any 64-bit version of windows 8. Whereas, Generation 1 provides the same virtual hardware to the virtual machines as in previous versions of Hyper-V. Click on next to continue.
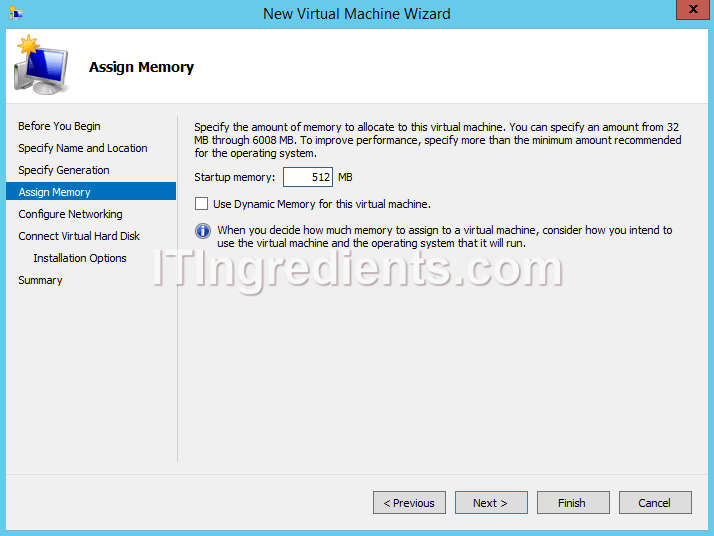
9. On “Assign Memory” console, Specify the amount of RAM in MB to allocate to this virtual machine. By default, it takes 512 MB. If we check “Use Dynamic Memory for his virtual machine” then virtual machine uses the RAM as per its requirement from the physical server. But, to a maximum limit of 512 MB. If we remain, uncheck this option, whole 512 MB of RAM will be allocated to the virtual machine. Click on Next.
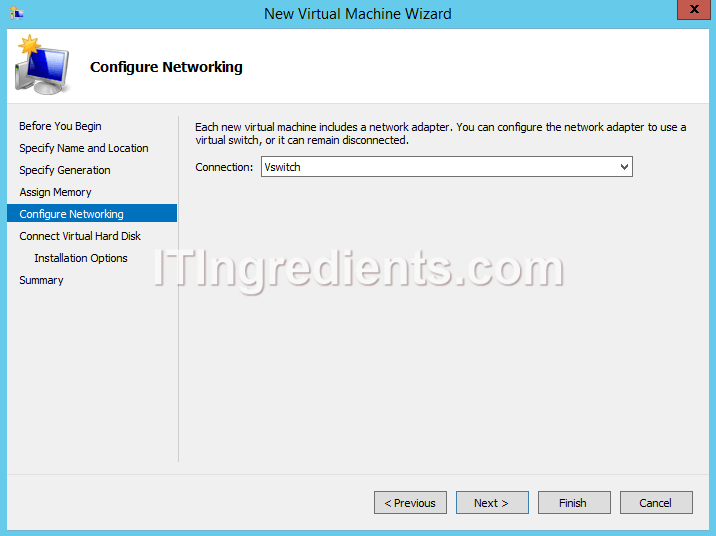
10. On “Configure Networking” console, Select a virtual switch from the available virtual switches in the drop-down menu of connection. In this practical, Vswitch is the name of the virtual switch that we have selected. Click on Next to continue.
11. On “Connect Virtual Hard Disk” console, select “Create a virtual hard disk” and verify the name, location, and size of the hard disk. If you want to change the default settings then change or click on Next to continue with the default settings.

12. On “Installation Options” console, select “Install an operating system later” to install OS later or select “Install an operating system from a bootable CD/DVD-ROM” to install OS either from a physical CD/DVD or from an ISO file. Or select “Install an operating system from a bootable floppy disk” to install OS using a bootable floppy disk or select “Install an operating system from a network-based installation server” to install the OS using the network. Here, we will install the OS in this virtual machine through an ISO file and also specified the location of ISO file here. Click on Next to continue the installation process.

13. On “Completing the New Virtual Machine Wizard” console, we can verify all the steps which we selected on previous consoles. Click on finish, to create the virtual machine and to close this wizard.

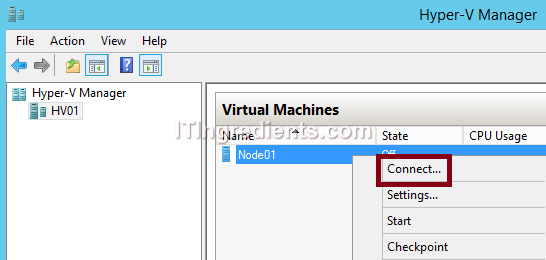
14. On “Hyper-V Manager” console, under Virtual Machines we can see that our virtual machine Node01 is listed. Right click on Node01 then click on “Connect“.
After connecting with the virtual machine, power on the machine and it will automatically start installing the operating system using the ISO file. Using the same steps you can create multiple Virtual Machines on Hyper-V server.