How to configure Storage vMotion in VMWare vCenter 6
How to configure Storage vMotion in VMWare vCenter 6
In this post, we’ll learn the steps to configure Storage vMotion on VMWare vCenter Server 6. In the old posts, we have already learned the steps to configure iSCSI Storage on Windows Server 2012 R2 and also the steps to add Shared Storage to VMWare ESXi 6. Storage vMotion is required to move the VMDK or files of Virtual from one storage to another storage.
Normally we configure storage vMotion to move Virtual machines either from local datastore (storage) to iSCSI Target Servers or to move the Virtual Machines from one Shared Storage to another.
Steps to configure storage vMotion on VMWare vCenter Server 6
Step 1:
Login to vCenter server and select the machine which whose datastore you would like to migrate from local to shared Storage.
Click on Summary Tab. It would show you all the information of that Virtual Machine.
As we can see that this Virtual Machine is currently on local Storage/ datastore.
Step 2:
Select VMWare ESXi server and select Configuration tab and then select the Storage option.
It would show all the storages attached to this VMWare ESXi Server.
If you are not sure then visit steps to create iSCSI Target and steps to add Storage to vCenter server.
Step 3:
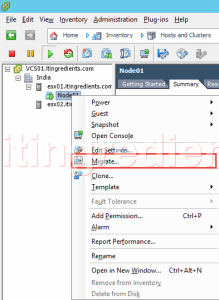
Right click the Virtual Machine that you would like to migrate from local storage to shared storage.
Select Migrate.
Step 4:
Select “Change Datastore” and click on next.
We’ll talk about “Change Host” option in upcoming posts.
Step 5:
All the Storages attached to this VMWare Host would be visible here.
Select the storage to which you would like to migrate this VM. In this practical we’ll migrate the VM from local datastore to VOL1.
Also select the virtual disk format. Our existing disk is using Thin Provisioning format and we want to use the same therefore we selected the default option of “same format as source”. However you can change the same as per your requirement.
After you select the storage please ensure you see “Validation Succeeded” under compatibility. This option confirms that VM can be migrated to another datastore without any issues.
Step 6:
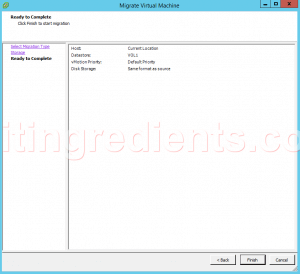
Verify all the settings and if no changes are required then click on Finish to start the process of storage vMotion.
Step 7:
After process is completed. Select the VM, select Summary Tab.
Under storage if it shows the shared storage (VOL1 in this practical) then it confirms that Storage vMotion is completed successfully.
Hope you understood the steps to configure vMotion and migrate VM from one datastore to shared datastore. Please feel free to leave your comments and suggestions.


Best article on vmware storage vmotion. It helped me in migrating live VMs from one storage to another storage.