

How to configure DHCP Server Scope in Windows Server 2012 R2
How to configure DHCP Server Scope in Windows Server 2012 R2
In this post, we’ll learn the steps to configure DHCP Server scope. DHCP is known as Dynamic Host Configuration Protocol. It is used to assign a dynamic IP address to computers. It allows the computers and devices to connect to the other network resources, such as DNS, WINS and routers.
Unlike static address, managing dynamic IP address is very simple and easy to manage. DHCP will help you centrally manage and configure IP address for your environment. You don’t need to maintain the list of IPs that you have already assigned or worry about assigning similar IP to multiple computers or issue of IP conflict.
Steps to configure DHCP server Scope
1. To configure DHCP Server scope, click on Start button, select the down arrow and select DHCP icon.

2. To create the new scope, right click on IPV4 then select on New Scope. Scope is a group or range of IPs that DHCP would lease to clients.

3. It opens “the New Scope Wizard”. It defines the range of IPs DHCP will assign to client. Range of IPs are directly linked with the total number of computers and future forecast. Please ensure that future growth projected should be accounted while defining the range of scope.
4. To configure DHCP Scope , enter the name of the Scope you want to define as per your requirement and you can give a brief description, then click on next to proceed.

5. On the “IP Address Range” window, we have to define the range of IPs for the scope. Click next to continue. In the “Subnet mask” define the subnet mask.

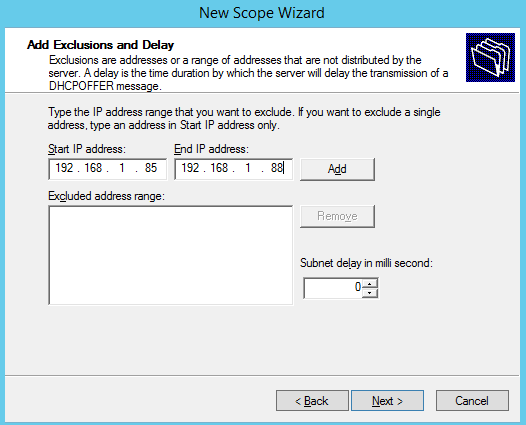
6. On the ” Add Exclusions and Delay” console we set the IP range that we want to exclude. In this console, we set the range from 192.168.1.85 to 192.168.1.88 as our excluded range and then click on ADD to set excluded address range. Exclusion defines the range of IP address that DHCP will not offer or assign to client machines. To continue, click next.
7. On the “Lease Duration” console we can define the lease for the IP, by default the lease is for 8 days. It can be increased or decreased as per your requirement.

8. On the Configure DHCP options select checkbox “Yes, I want to configure these options now” and click next to continue.

9. To add an IP address for a Router (Gateway) used by clients, enter the address below otherwise click on Next to continue.

10. On Domain Name and DNS Servers window enter parent domain and DNS server name and DNS IP address. In case of multiple DNS IPs you can add them individually. Click next to continue.

11. On WINS Server window enter the details like Server name and IP address otherwise click on Next to continue.

12. On Activate Scope window select “Yes, I want to activate this scope now” to activate the scope otherwise select “No, I will activate this scope later” to activate it after sometime. DHCP would not start assigning IPs to client machines until it is activated.

13. On “Complete the New Scope Wizard” click ‘Finish’ to close the console.

How to create Exclusion range from DHCP address pool
1. As we already excluded some IPs from the scope. Now, we’ll learn the steps to exclude IPs after DHCP scope is configured. Expand scope and right click on ‘address pool’ then select “New Exclusion Range..”.

2. In Add Exclusion window, type the IP address range that we want to exclude. Single IP can also be excluded instead of complete range of IPs.

3. For this example, we’ll exclude IP range starting from 192.168.1.89 to 192.168.1.90 and click add to create it.

4. In DHCP window under Address Pool we can verify that from 192.168.1.89 to 192.168.1.90 IP Addresses are excluded from DHCP distribution.
